
How-To Plan the Perfect Road Trip Route
If you’ve planned a road trip of any length, you’ve likely asked yourself the question, “Where do I even start?” We have some suggestions and guidance on exactly that in this article on planning the perfect road trip route.
Note: This article is specific and limited to planning the route of a road trip once your destinations have been identified.
Go check out our blog on the trip research and location scouting necessary to get to this point!

TABLE OF CONTENTS
Recap of ‘How-To Find Epic Trip Locations’
Overview of Our Process
Google Maps
Google Slides (or similar)
Further Define Your Route
Calculate Drive Time & Distance
Add More Details From Additional Research
Google Maps Offline
Google Slides (or similar) Offline
Examples From Personal Experience
Paper Maps
1. INTRO
When it comes to planning the perfect road trip road route, it helps to have a general idea of where you’ll be traveling. Most people start by searching the internet for pre-planned trip itineraries, blog posts with recommended stops, or TripAdvisor’s 15 BEST Things To Do In [insert any location here] articles.
Most importantly, we show you where to easily store that information for future use and how this simple task can build up clusters on the map with destinations you’re interested in visiting over time and how this will eventually form a great starting point for further planning.
This sounds straightforward but when you dive into calculating drive time between stops, how many stops in a day, where to find lodging, how to plan for detours, or how to handle the unexpected, planning for a fun vacation can quickly become overwhelming.
That’s why we’ve broken down our process for route planning.
If you’ve read our post on How-To Find Epic Trip Locations then you’re already familiar with the tools we use. We provide further detail on why they are useful for route planning, but to get straight into the step-by-step instructions, skip ahead to section four!
2. THE TOOLS WE USE
GOOGLE MAPS
Google Maps allows you to view the globe with various layers from traffic and transit to topographic and satellite imagery.
It also allows you to click into a countless number of locations and view pictures, read reviews, learn detailed information, and much more. Our favorite feature is the ability to drop pins and save for future use.
First and foremost, Google Maps offers the ability to add stops to a route, a feature that is crucial to road trip planning. You can add up to ten stops to a single route (and reorder them once they are entered) whereas other apps limit you to only one or two. If you need to add a general stop like food or gas, you can search for convenient locations along the route and quickly add the detour without interrupting the active directions, making unplanned stops quick and simple. You also have the ability to identify road closures, toll roads, accidents, or speed traps, and can avoid any by quickly rerouting to an alternate that is suggested for you.
There are many other reasons why we choose to use Google Maps, but the last one we will mention is the handy feature that allows you to easily send your saved route to your phone or email to quickly pull up directions in the future, saving you time and a headache!
Although Google Maps can offer a lot of useful information on the road, there is some information about your trip that you may need to get elsewhere like reservations or permit requirements, closing times, or your day plans. We store all of this in Google Slides.
GOOGLE SLIDES
As you begin forming your exact route, you will break it down into sections - more on that in a minute. This comes with a lot information such as drive time, your tentative day plans, location specific details like entrance fees, closing times, or parking instructions, and any other information specific to your trip. We use Google Slides to house all of this important information.
It has also come in handy when we’re running short on time and have to decide which stops we want to exclude from our route. Rather than arbitrarily decide based off of the name, we can take a look at the pictures as a reminder and also read some of the details we included before making our decision.
Speaking of details and offline use, this is the main reason why we store our information in Google Slides. You may be thinking “That’s what Googles for”, but it’s nice to have everything handy when you’re somewhere without a cell signal and you need to recall these important details. This happens more often than you might expect.
Now that we’ve given an overview of the reasons we’ve chosen to use these tools, let’s get into the How-To in regards to route planning!
3. FORMING A ROUGH ROUTE
In a previous post, How To Plan Epic Trips, we walked through the process of dropping pins on the map overtime and then utilizing the resulting groups to form a rough route for your road trip.
We want to recap that here and then build upon it as we add more detail and begin calculating each sections distance and duration.
Below is an overall view of our map of the U.S. with hundreds of pins dropped on locations we’re interested in visiting.
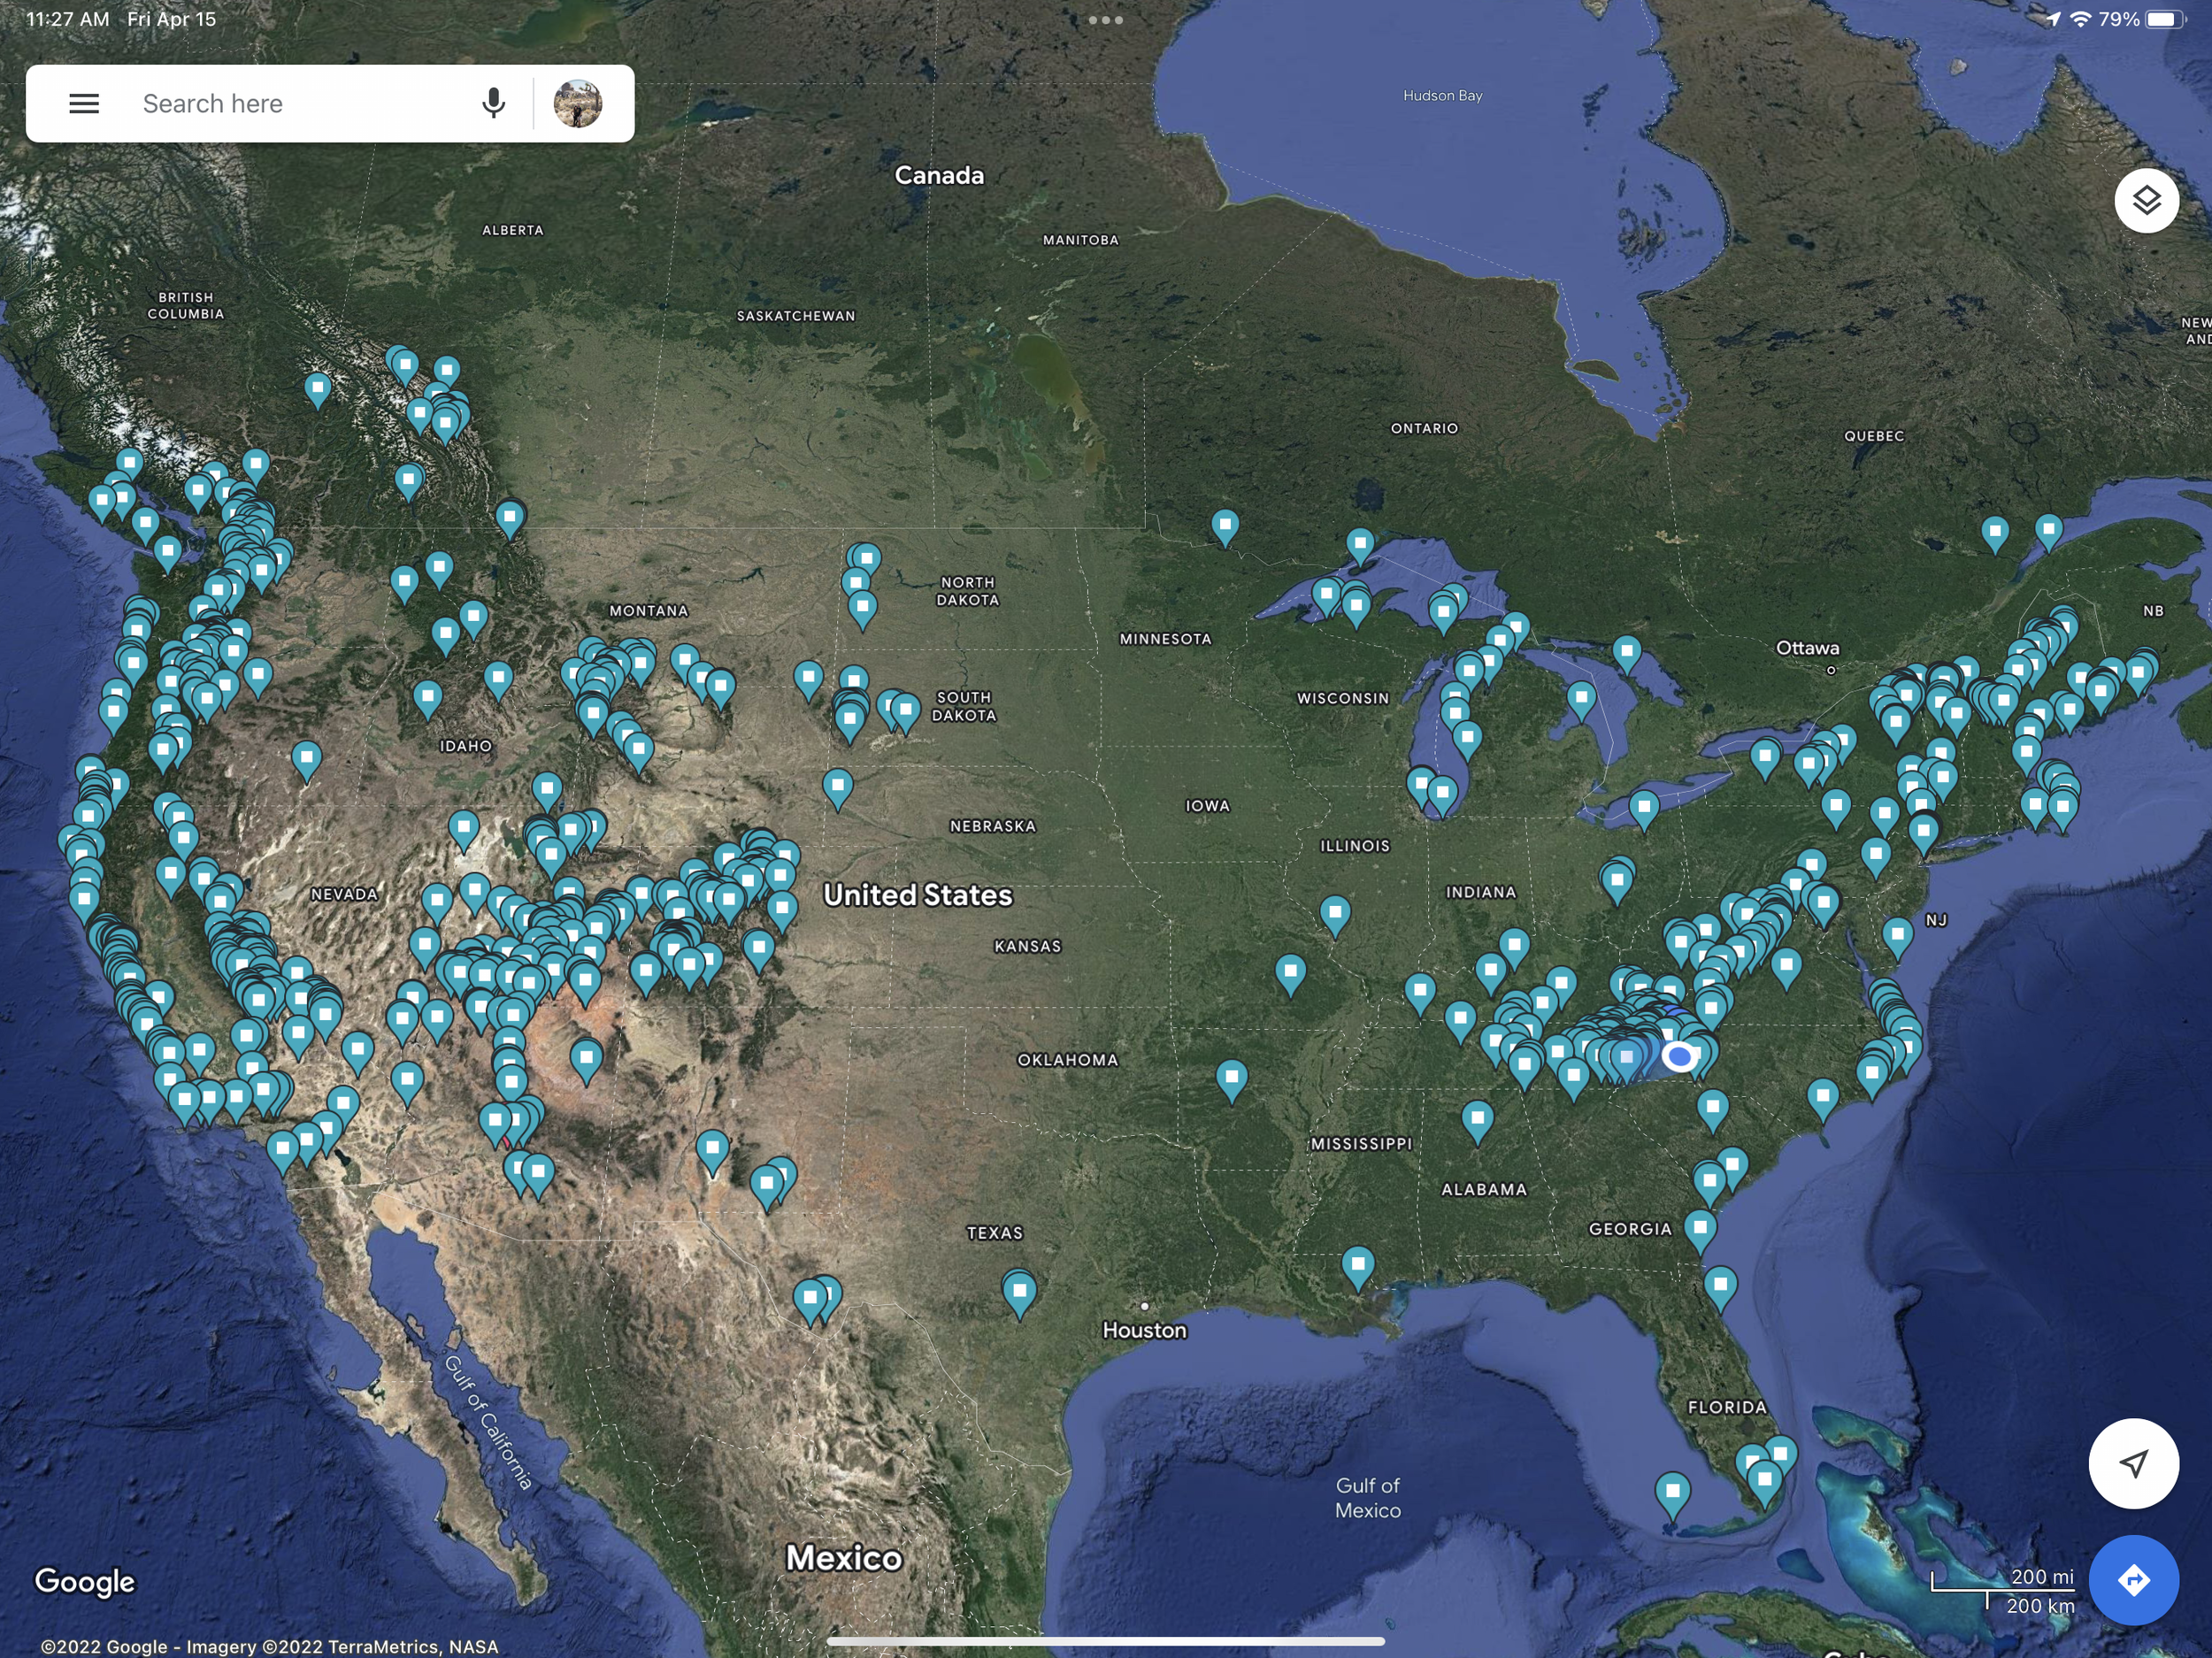
All of our pins to date, with the satellite layer turned on.
Zooming into the Northeast, you may be able to see that we already have a general route beginning to form from our pins.

Take a look at this next image with our proposed route shown in red.
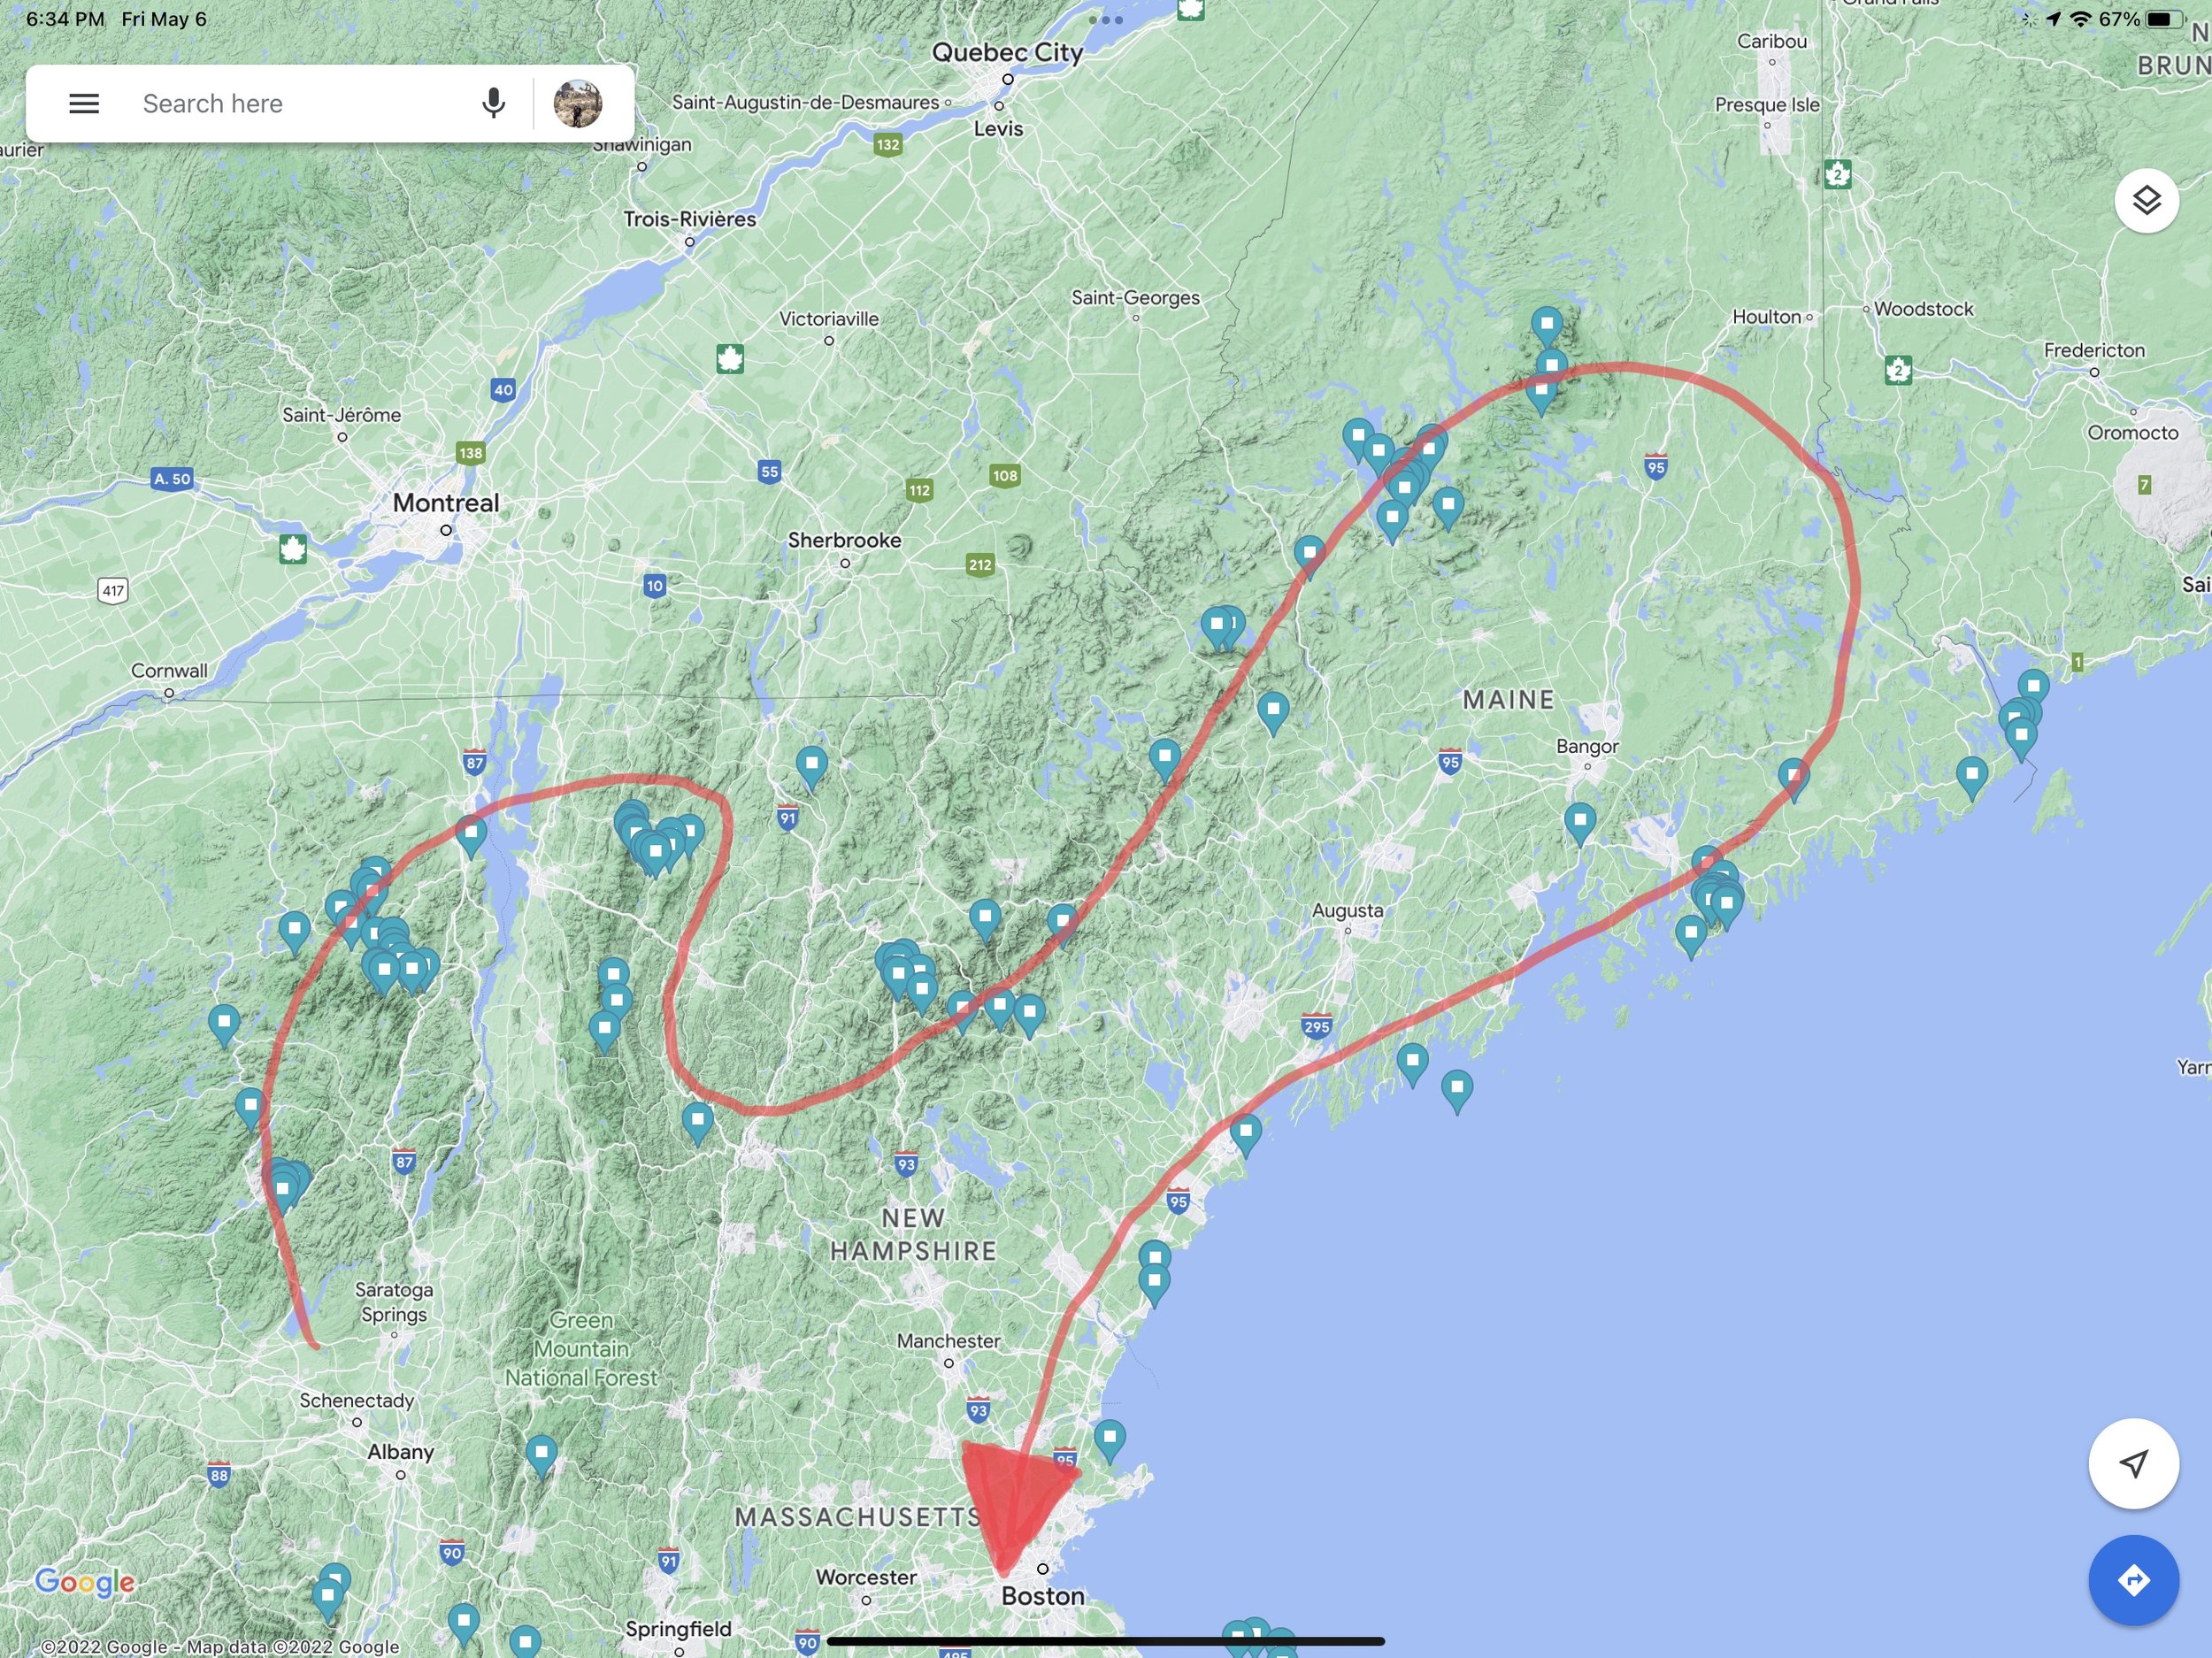
That is our rough route! The process of pinning our locations of interest took place over months or even years and their natural relation to each other is what we’ll use to further add detail to this route.
4. PLANNING YOUR TRIP IN DETAIL
Now that we’ve set the foundation you see our route starting to come together, let’s further refine it!
That could be printing out the driving routes we’re about to create and highlighting with color and taking notes by hand.
Or, if you’re like us and prefer to work digitally, you can utilize tools like Google Slides or PowerPoint. We choose to use Google Slides for some of the extra features, but anything will work!
FURTHER DEFINE YOUR ROUTE
We have found the next several steps in the planning process to be much less daunting if we break the route down into smaller sections for further planning and added detail.
We’ll continue with our example from the Northeast.

We will use these clusters to our advantage and define each as its own section.
To what extent you break down these sections is totally up to you!
CALCULATE DRIVE TIME & DISTANCE
Due to the limitations of Google Maps, it would’ve been very cumbersome (and probably impossible) to add all of the location pins in our Northeast region to a driving route at once.
Tip - The steps for creating a driving route are best done on a desktop. It’s much easier to select your pins and add them as stops on the desktop than it is on a mobile device.
To do so, select your starting location.
Next, hit the “Directions” button to bring up the side menu you see above.
From here, hit “Add Destination” and select the next logical pin on the route.
Once the route is drawn on the map you can rearrange the stops if it doesn’t make the most sense.
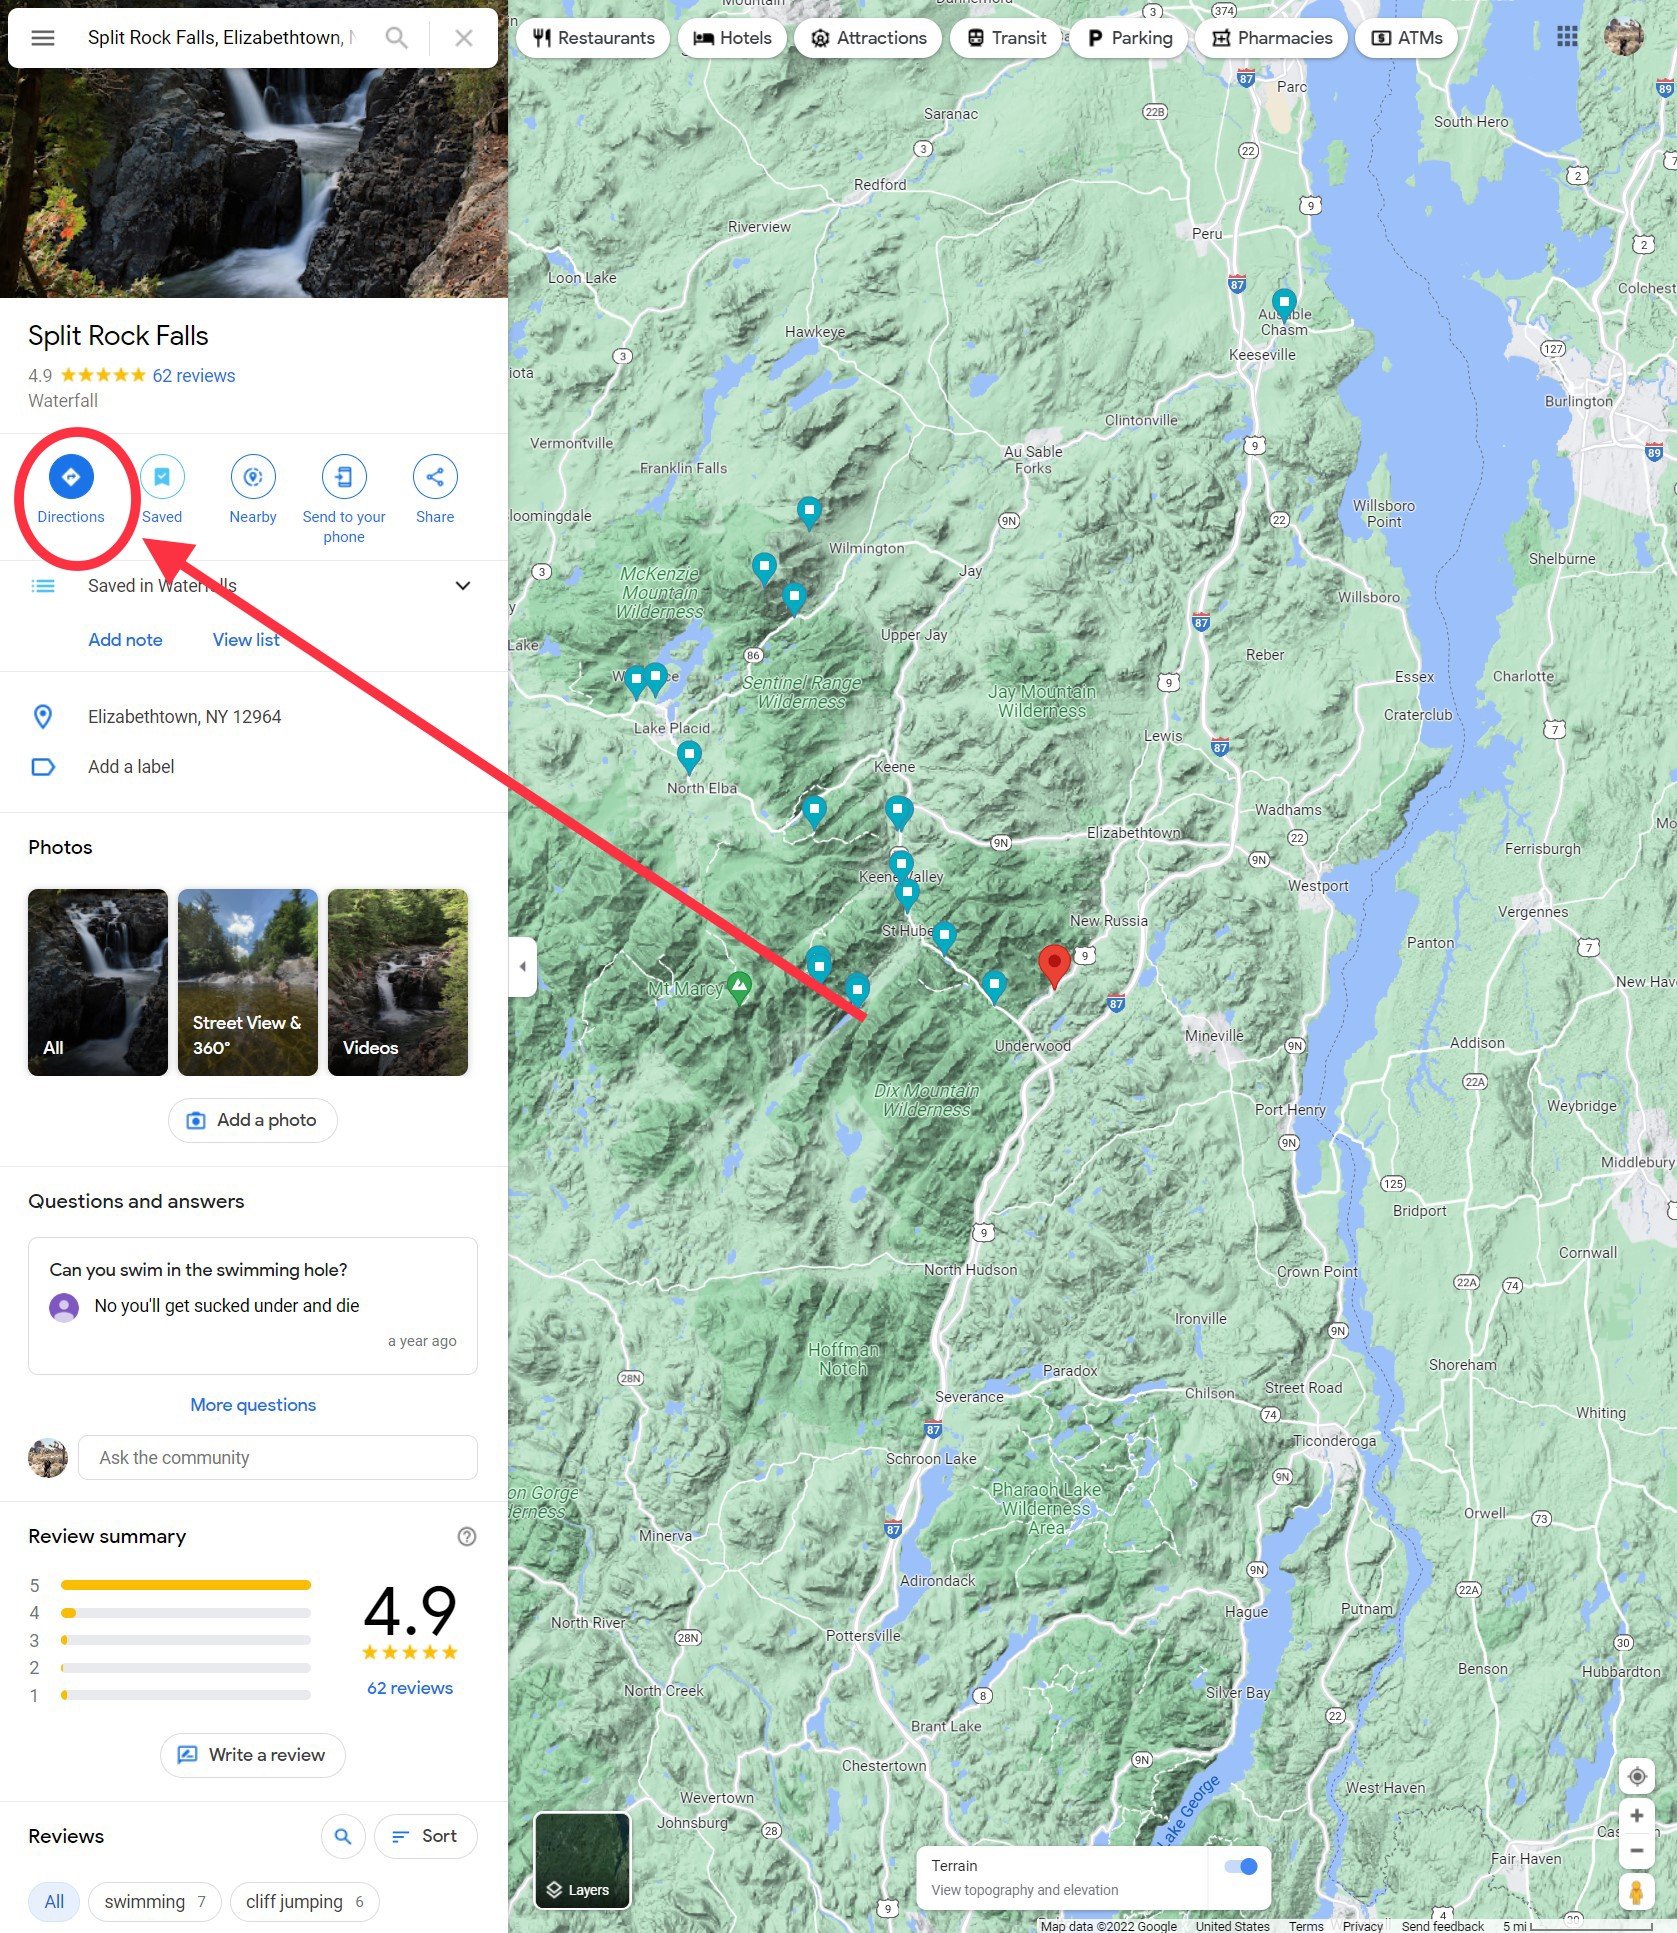
Screenshot taken on the desktop version of Google Maps. It’s highly recommended to complete this step on desktop.
Once your route is established, hit the “Details” on the left hand menu.
This not only shows the overall trip duration and mileage, but also (as circled in red) the time and distance between your stops.

Screenshot taken on the desktop version of Google Maps. It’s highly recommended to complete this step on desktop.
Tip - Another convenient option at this point is to use the “Share” feature for the route you just created and save the link off to the side. This will let you click the link later on and come back to the same route without having to enter each stop again.
ADD MORE DETAIL
At this point we like to take another screenshot of the last step from above that shows the driving route between each pin, and add it to our slide deck.
Calculating the remaining routes is rinse and repeat, and we’ll bring those screenshots over as well.
Then, we start adding as much detail as we feel is necessary.

It includes a screenshot of the driving route like we mentioned, front and center.
We’ve overlaid keynotes and annotations to identify each stop a little more easily as well as the duration of each drive between points.
On both sides of the map there are tons of details. Everything from a summary of the day, to hike lengths and elevation gain, to camping rules and reservations, and contact info.
5. SAVING FOR OFFLINE USE
By now we hope that you see why we go through the trouble of documenting everything in Google Slides (or any other medium you choose).
However, like we’ve mentioned several times, none of it does any good if you can’t access it while at a location without a cell signal.
MAKE GOOGLE MAPS AVAILABLE OFFLINE
We mentioned a few steps that are easier to do on your desktop, but we doubt you’ll be taking that on your next trip. So, Google Maps makes it easy to save sections of the map to your phone for use when offline.
Check out the quick video below or continue for the step by step guide.
To save maps for offline use:
Tap on your profile icon or the hamburger icon in the search bar to bring up the menu.
Tap “Offline maps”
Then, tap “Select your own map”
You can pinch to zoom out and the blue box will show the area that will be downloaded.
As you zoom, you’ll notice the download size increase or decrease depending on the amount of information in that particular area.
Once you’re happy with the area you’ve selected, tap “Download”.
After a few moments, that area of the map is now ready to be accessed even when you don’t have a cell signal! You can download as many areas as necessary so long as your mobile device has the required storage space.
There are two downsides to using Google Maps offline:
You can only view the basic map layer, no topo or satellite views. This is one of the reasons we also use Gaia.
You’ll also no longer be able to view the photos, read reviews, or see any of the other information that was previously available for the locations. This is the reason why we document all of that detail in the slides.
Aside from that, you will still be able to see your pins, view the notes you may have added, and create a driving route between each location, all without any cell signal at all!
MAKE GOOGLE SLIDES AVAILABLE OFFLINE
If you’ve chosen to take your notes by hand, congratulations, you’re finished!
If you’ve created a slide deck with all of that info, it’s also incredibly easy to make available offline.
All you need to do is export as a PDF or JPEG and send it to your mobile device.
Make sure you save it to your photos or files app and test that it’s accessible while offline.
6. CLOSING THOUGHTS
So What Have We Learned?
Pick out the tools that will work for you and learn how to use them
Use your saved pins to create a general route to use as a starting point
Break your route into sections
Use the Details feature to map out drive time between destinations
Add detail for each section and location wherever you save your trip information
Save your documents for offline use
Be flexible and have fun
To Wrap It Up…
The planning phase of a road trip isn’t fun. It is time consuming and can be overwhelming.
This process has improved our time on the road immensely.
We’ve been on road trips where the only planning we did consisted of a general route but no plan of where we would stop each night.
We wanted to be flexible, not have a structured itinerary. So, we left it vague. This resulted in a lot of stress, uncertainty, and unnecessary time trying to plan in real time.
Just because it’s planned in detail, doesn't mean we can't take our time or make last minute changes, in fact it's the opposite. The extra detail and effort we put in up front is exactly what allows us to be as carefree as possible.
You can never plan too much but you can certainly plan too little.
If you have tips or tricks that you’ve found to be useful when planning a road trip, let us know in the comments below!
That’s it for now!
Catch ya next time!
Taylor and SethRelated Article:

How-To Find Epic Trip Locations
Whenever we get into a discussion with someone about trip planning and location scouting, they are always surprised and curious about the way we go about it. This article will cover the workflow we follow to find and research our road trip destinations.

Hi, we’re Seth and Taylor and we love sharing all things related to outdoor adventure!
We love anything that gets us outside — hiking, biking, backpack, road tripping, and so much more! We love sharing our adventures and hope it helps YOU get out to see more.


Newsletter:
Be the first to know when we release something new and sign up for our Newsletter!
Other Reads:


This photo journal invites you to explore the vibrant heart of San Francisco, a city renowned for its iconic landmarks, diverse neighborhoods, and breathtaking vistas. From the majestic Golden Gate Bridge to the charming streets of Chinatown, each image captures the essence of a city that is both timeless and ever-evolving. As you wander through these images, let the unique character and beauty of San Francisco unfold before your eyes, offering a glimpse into the spirit and stories that make this city truly unforgettable.